Pinterest is a wonderful and fun tool for collecting inspiration and aspiration… so it only makes sense that it’s also a fantastic marketing channel for your handmade stores! But how much traffic does it generate?
Find out how to measure your Pinterest visitors more reliably and control how they appear in your Google Analytics reports.
How does your traffic from Pinterest currently look?
In Google Analytics, every visit (or session) has a Source and a Medium attributed to it, often written together like this: Source / Medium. For Google searches that’s google / organic or facebook.com / referral for visits from Facebook.
In Google Analytics 4, go to Reports > Life cycle > Acquisition > Traffic acquisition.
In legacy Universal Analytics, go the REPORTING tab and open the Acquisition > All Traffic > Source/Medium report.
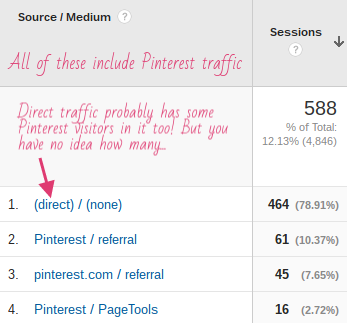
Visits from Pinterest can show up in Google Analytics under a few different sources.
- The default for desktop visitors is pinterest.com / referral
- The most common browser extension for pinning automatically uses the PageTools medium. (This does NOT get put into the GA Social reports by default, which is bad.)
- Some people using the mobile app might come through in (direct) / (none) – that’s really bad and you can’t tell for sure which visits these are!

You also can’t easily see which Pin was clicked. You can look at the Landing Pages to see the listing they landed on. You can also look at the “Referral Path” for some visits to get the link to the actual Pin, but you can’t tell what Pin it is without opening it.
Wouldn’t it be nicer to see a list of easy-to-read Pin descriptions, directly in Google Analytics?
How to use UTM campaign tags to track visitors from Pinterest
Campaign tags (sometimes called “UTM tags”) are extra bits we can add to any page URL to send more information to Google Analytics about how that page was reached. GA already knows how to read campaign tags, so you don’t need to do anything inside Analytics. Just update the URL and promote it where it’ll be clicked… in this case, on Pinterest.
1. Etsy only: Find the base URL for your listing
Your special campaign tags are added to the end of the URL to your Etsy listing. So the first thing to do is find this base URL.
In Etsy, open your listing and have a look in the URL bar of your browser. It should look something like this, depending on how you got to the page:
https://www.etsy.com/au/listing/203450297/cream-shell-brooch-with-fine-crochet?ref=shop_home_active_14
If you’ve read about how to fix your traffic sources, you’ll know that Etsy adds things to their URLs that are specific to you and how you got to that page. We need to strip these out to make this URL more generic.
- If you’re not in the US, remove the country code towards the start (eg. /au).
- Remove everything at the end from the question mark onwards (including the question mark).
The base URL for this listing looks like this:
https://www.etsy.com/listing/203450297/cream-shell-brooch-with-fine-crochet
Always paste the URL back into your browser to TEST it first! Make sure it still opens your listing.
2. Decide on your tags
Source = pinterest.com
This Source is where most desktop visitors from Pinterest already appear, so let’s keep using it.
Medium = social
Google Analytics is already putting most of your Pinterest traffic in your “Social” channel, so let’s stay consistent. Technically, Pinterest is more of a search engine than a social network!
Do you run Promoted Pins?
Make sure you use UTM campaign tags for those pins too! For Promoted Pins, use a different Medium so you can tell the difference between organic and paid Pinterest visitors. I recommend utm_medium = paid-social (GA4 will automatically detect that as paid social and group it separately to your organic, unpaid, social visits).
Campaign = Board name
Group your pins by the Board you pin them to, as the “campaign”. This is especially handy if you pin one product to multiple Boards (with different photos or descriptions), so you can easily tell the difference between visitors.
This Board name will come through as the campaign name even as your pin gets re-pinned to other people’s Boards.
Content = Product name
It’s easy to just check the Landing Page to figure out what Pin was clicked, but why not include some extra detail about the Pin itself? What type of photo or description did you use?
eg. Small Blue Teddy – Close up or Pink Rose Earrings – Story description
3. Put the link together
For each listing you want to Pin (which should be all of them!), follow this pattern to put all these pieces together:
[base URL to your product page]?utm_source=pinterest.com&utm_medium=social&utm_campaign=[board+name]&utm_content=[pin+description]
You can also use a URL builder tool to do it for you.
Here’s one of mine:
https://www.etsy.com/listing/203450297/delicate-cream-snail-shell-pendant-shell?utm_source=pinterest.com&utm_medium=social&utm_campaign=Super%20Snails&utm_content=Cream%20snail%20shell%20with%20cream%20-%20Brooch%20Ltd%20Ed%2014-39
Important!
Replace ALL spaces with simple plus signs (+) or use a URL builder tool, which will replace them with “URL safe” symbols like this: %20. Either one will show up as a real space in your Google Analytics reports.
4. Use the link in Pinterest
Once you’ve got the link ready, you’re ready to pin your listings!
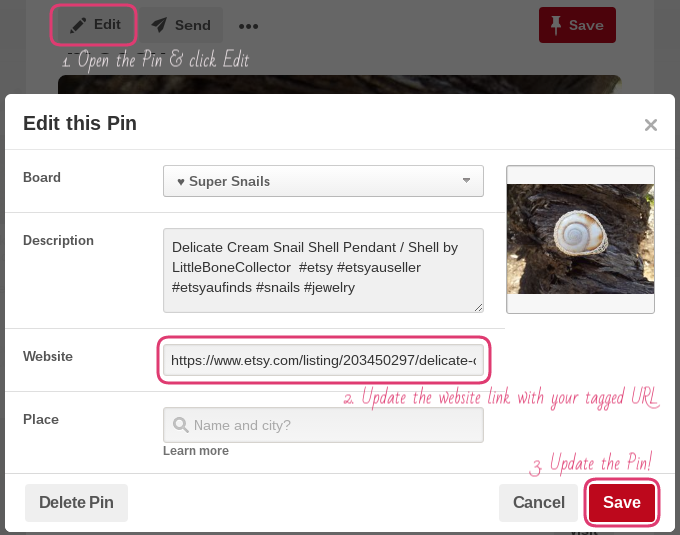
There are many ways you can pin your listings. If you add a Pin directly in Pinterest, you can paste in your tagged URL directly, then choose the main product photo to use as your Pin.
However, it’s really beneficial to use a different photo just for pinning (in the ideal, portrait dimensions) or you might use another Pinning tool or browser extension. If you can’t edit the URL for the Pin when you’re creating it, you’ll need to go into Pinterest and EDIT the Pin straight away to update the URL.

Editing an existing Pin?
If you edit an existing Pin, your re-pin numbers will reset back to 1. This may affect how the Pin shows up in search results.
If you have existing Pins with lots of re-pins, consider making new Pins for the listings instead. This is a fantastic opportunity to try out some different pinning strategies!
More Pinterest resources
If you don’t yet have a favourite pinning technique or strategy, check out some of these great resources:
