

If you have a boutique ecommerce shop, you probably use Instagram.
But if you look in Google Analytics, you’ll see close to no traffic from this supposedly wonderful handmade-marketing-engine. What’s going on?
Is it a failure? Or are your Instagram visitors just hidden?
When somebody taps the link in your profile and it opens your shop, Instagram doesn’t pass on any “referral” information to your shop. It doesn’t tell it that Instagram opened that link. As far as your shop is concerned, and therefore your Google Analytics tracking code and even Etsy Shop Stats (for Etsy sellers), that person may as well have opened up their mobile web browser and manually typed your shop address in.
In other words, Google Analytics and Shop Stats track that as a Direct visit.
And you have no idea which of all your Direct visits came from Instagram. You can guess by looking at which ones came from mobiles or tablets, but it’s not reliable.
This is where campaign (or UTM) tagging comes in.
In Google Analytics, every visit (or session) has a Source and a Medium attributed to it, often written together like this: Source / Medium. For Google searches that’s google / organic or facebook.com / referral for visits from Facebook.
In Google Analytics 4, go to Reports > Life cycle > Acquisition > Traffic acquisition.
In legacy Universal Analytics, go to the REPORTING tab and open the Acquisition > All Traffic > Source/Medium report.
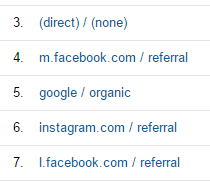
Logically, visits from Instagram should show as instagram.com / referral, right? Let’s make it happen!
How to use Campaign Tags to track Instagram visitors
Campaign tags are extra bits we can add to any URL to send information about where that link was clicked. In this case, we’re going to add them to our Instagram profile link (which opens our shop) to tell Google Analytics that those visits come from Instagram.
We’re going to use Bitly to create a short URL to hide a very long URL to set the following campaign tags for your shop:
source = instagram.com
Other social networks send the whole domain as the source, like facebook.com or twitter.com. We should use the same format.
(Note that this isn’t strictly necessary, but I just really like consistency.)
medium = social
Use the “social” medium to group these visits with visits from other social networks.
campaign = bio
We have to send a Campaign name. Sometimes you might want to use something specific, like “Winter Sale”, to track links about the same campaign that you send out on all your social media platforms. But this is a very general link-in-bio, so let’s label it where it is: “bio”.
Putting the link together
Follow this pattern to put all these pieces together to create a long link to the front page of your shop:
[base URL to your product page]?utm_source=instagram.com&utm_medium=social&utm_campaign=bio
Here’s mine:
https://www.etsy.com/shop/littlebonecollector?utm_source=instagram.com&utm_medium=social&utm_campaign=bio
Visit it in your browser first to make sure it works!
Make a short & easy version with Bitly
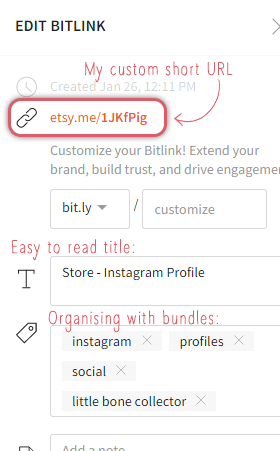
That’s a pretty long link, right? It’ll look a bit ugly in your Instagram profile, so let’s make a short and easy version.
- Sign up for an account with Bitly (a great URL shortener service). If you already use another one that you like, that’s fine.
- Once you’re signed up and logged in, paste that long URL you just tested into the box at the top of the page in Bitly. You might have to press “enter”.
- If your shop is on Etsy, Bitly will give you a short “etsy.me” address, since it detects that you’ve entered an Etsy URL. Mine is “etsy.me/1JKfPig”.
Hints:
You can also customise the link to get something like bit.ly/yourshopname but you can only use each custom name once. If you make a mistake or want to use that custom name for another link, you can’t change it. I’d recommend just using what Bitly gives you by default until you’re really comfortable with Bitly and creating custom campaign tags.
On the other hand, definitely customise the Title of the link (I used “Store – Instagram Profile”) so they’re easy to distinguish in your Bitly account. You can also add the link to “Bundles” to make groups of links that are similar. You could make ones like “Social”, “Instagram”, “Profiles” and your store name.
A BIG benefit of sticking with the etsy.me address is that it adds a level of credibility and trust to what could otherwise be a pretty “weird” link for some people. It helps your audience know that they’re really going to an Etsy store.
Update your Instagram profile
You can update your Instagram profile on your computer, mobile phone or tablet. Here’s how to do it on your computer, where you’re probably reading this post!
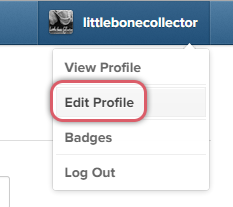 Head over to instagram.com and log in.
- Click your name in the top-right and choose “Edit Profile”
- Paste the link you got from Bitly in as your “Website”
- Submit to save
Now view your profile just to double-check it’s there.
Check if it’s working!
You might already filter out your own traffic from Google Analytics, so first make sure that you’ve got a “Raw Data” view created so you can see your own activity.
- Open your Instagram profile in a normal web browser (not your phone or tablet).
- Click your profile link and wait for your shop to open.
- If you have an Etsy shop, you must navigate to an individual listing page before any traffic will appear in Google Analytics!
- In Google Analytics, head to your Real Time > Traffic Sources report.
- Look for a current visitor with Medium = social and Source = instagram.com
- Click on “referral” and the report will re-load, with a new second column called “Campaign”. Make sure that the value in this column is the same as the Campaign you chose for your link – probably “bio”.
That’s you!
You can also try the link from the Instagram app on your phone or tablet, if you do NOT open your shop in the Etsy App.
Find Instagram visitors in your regular reports
Once your link is set up, there are many ways to view this data in Google Analytics. Here’s one simple way to single-out just your Instagram visitors for review.
These instructions are for legacy Universal Analytics.
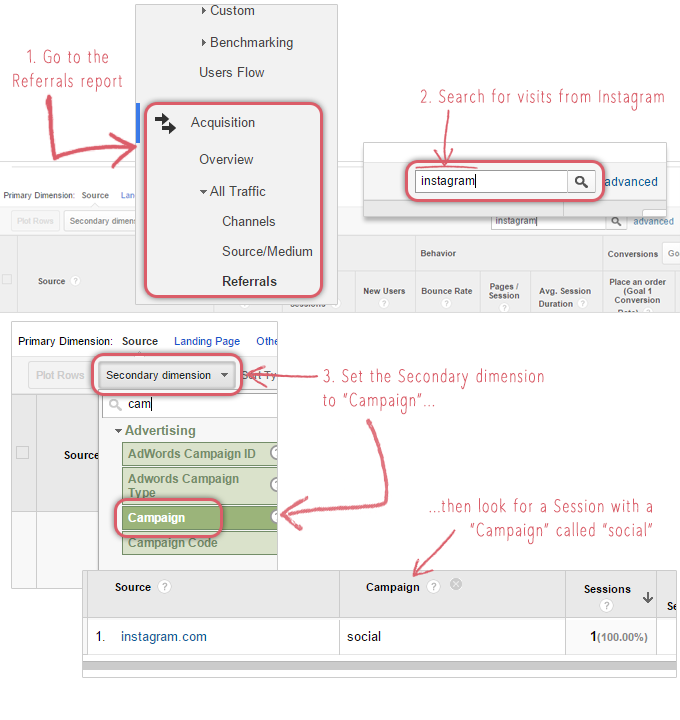
- Head to your Acquisition > All Traffic > Referrals report.
- Search for “instagram” (top-right above the table).
- Set the “Secondary dimension” to “Campaign”, just to make sure they’re definitely visits from our special link, and not visits from someone on their Desktop from before we changed the link (that visit would have no campaign set).
You can also find these visitors in your All Traffic, Social and Campaign reports. Experiment!
But what about all those people using the Etsy App?
The Etsy App is nice, but it doesn’t send data to Google Analytics 🙁 This is very sad and affects all visits, not just those coming from Instagram. Even Etsy Shop Stats lumps all App visits together into one “source”.
But all is not lost! This is where using Bitly really comes into its own.
In your Bitly account, you’ll notice that it records its own stats for clicks on all the links you create and save. These click stats are recorded before your shop is opened, whether in the App or the person’s mobile browser.
So these stats include all visitors, including Etsy App users! Yay!
The downside is that you still can’t see what these people did after they got to your shop, but you can at least get an better indication of how many real shop visits your Instagram account is driving.
Also do keep in mind that Bitly click stats can be more inflated by bots than Google Analytics, so the real number of clicks is probably somewhere in between what Analytics and Bitly each say.
If you notice no more clicks recorded in Bitly than you see in Google Analytics, please leave a comment! All information about your own experiences helps.
In my own account, I’ve seen a small number of extra clicks in Bitly on top of what’s tracked in Analytics, which are likely to be Etsy App users. It’s actually less than I thought, since the App is really popular!
Comments (15)
This is an amazing article, thank you! Do I have to do this for Pinterest also though?
Hi Katie,
Yes, you can do this for Pinterest too, in case it doesn’t track visits via the Pinterest app correctly. I don’t know for certain how they come through, but if you used a custom URL like this, it would keep it consistent between visits from the app and the Pinterest website. You just need to change the utm_source to “pinterest.com” and save a new link in Bitly (or wherever you keep them).
Pinterest does not like the Bitly link. It looks like spammers have been using it so they won’t allow it.
That’s a pity… Is that using the etsy.me or bit.ly style?
I think it’s most important to tag the actual product links that you pin, even more so than your Pinterest profile link. In that case, you don’t need to shorten it, since nobody sees the full URL.
It was for using both. They want to see the full address and do not want any forwarding going on.
I went on a tagging binge the other night and from what I read/experienced, it’s most important to tag as soon as you pin anything to Pinterest from Etsy because even though you can edit it at a later date, it does not update the link enterprise wide on Pinterest.
From what I saw during my binge, as soon as I changed the link address of past pins with 2,000+ repins, it acted as though that pin was brand new and the repin count started back at 1. This is not good because your number of repins helps you show up higher in searches or suggested pins.
Fantastic, that is all great to know. I’ll have to plan a series on tagging across different social platforms, both organic and advertising.
This is amazing article and would help a of people, just out of curiosity do you try this with a website? and if yes can you please share the training
thank you so much for this training again.
I
Do you mean can you do this if you link to your own website in your profile instead of Etsy? Absolutely. It’s exactly the same, you just change the link you start with. For example, you might put this into Bitly: http://www.laveradesign.com?utm_source=instagram.com&utm_medium=referral&utm_campaign=social&utm_content=profile
Thank you so much this is exactly what i need.
I followed all the directions. The bitly url is in my IG profile. When I click on it from my table it takes me to a page within Etsy that says Uh oh! The page you were looking for can not be found. Any suggestions why it didn’t work?
Hi, if you can post the link here I can have a look for you (I can’t find your Instagram profile). An easy way to make the right link is to visit your store front, then copy the URL in your address bar and use that to start from. You’ll want to delete everything from the end back to the question mark (eg. ?ref=l2-shopheader-name ) and replace it with the campaign tags I’ve used.
Hi Lesley! Thanks for posting this – I created a shortened link using Bitsy and inserted this as the shop link in my Bio on Instagram however in my Etsy stats, I still don’t see traffic from ‘Instagram’ – I believe it might be lumped into ‘direct traffic’.
Wasn’t the point of generating this Bitsy link, so that IG traffic could be tracked accurately and show up separately? Or am I misunderstanding your article? Is there a way to have IG traffic show up separately on your Etsy Stats?
Many thanks in advance for your advice! 🙂
Hi Anita,
I just had a look at your link and it looks perfect. Are you looking at Etsy Stats when you’re logged in to Etsy or in Google Analytics? This solution only gives information to Analytics. Over the same period of time, my Etsy Stats shows 3 Instagram visits vs 13 in Analytics.
Something important to note is that the Etsy app doesn’t send data to Analytics, so if somebody opens the link from Instagram straight into the Etsy app, you won’t see anything at all in Analytics (not even in “Direct”). In Etsy Stats, it’ll just be bundled in with “Etsy App” traffic.
Thanks! Very helpful Lesley!
Amazing post! Thanks a lot